+ Reply to Thread
Page 3 of 3 FirstFirst 1 2 3
Results 21 to 25 of 25

Thread: How to remove front bumper for TL ES

  1. #21
    ...
    Join Date
    Aug 2014
    Location
    New South Wales
    Posts
    961

    Default

    After much mucking around(including having to get the police involved and visiting the parents), as the miscreant gave me a false address, I have just got a claim number from the dimwits insurer.

    I am very fortunate to have realised that there may have been video footage of the collision available from one of the businesses nearby where the collision occured.

    It was my lucky day, as the other driver attempted to make unsubstantiated allegations.

    The video footage, acquired a week after the event, fully absolved me of any blame.

    Luckily, the repairer is located in the next town, so I won't be inconvenienced too much.

    The repairer selected by the insurance company is, fortunately, one of those who was prepared to use a genuine new "skin" in the repair process.

    Whilst keeping the car in very good mechanical order, this will prompt me to concentrate more on the appearance aspect of the car, which I have neglected somewhat.

    When the new bar is being installed, I might get some other aspects of paintwork looked at.

    I'm happy that I purchased a Mawson White example, making it less susceptible to paint issues.

    "whiteawd" is the benchmark to aspire to, but I know I will fall far short of that immaculate TL/TW AWD.

    https://www.aussiemagna.com/forums/sh...=1#post1650743
    Last edited by leadfoot6; 09-05-2019 at 03:33 PM.
    ...

  2. #22
    ...
    Join Date
    Aug 2014
    Location
    New South Wales
    Posts
    961

    Default

    Repair now completed to my satisfaction.

    Brand new headlights that I got from MitsFix last year when I went to Melbourne to have the 380 conversion done were also fitted as part of the job.

    It is looking good now with 15 years worth of stone chips/scratches/cloudy headlight covers now replaced with "newness".

    I have some before/after images to upload soon.
    Last edited by leadfoot6; 01-06-2019 at 10:32 PM.
    ...

  3. #23
    ...
    Join Date
    Aug 2014
    Location
    New South Wales
    Posts
    961

    Default

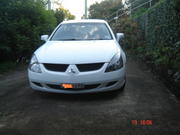
    Before - with the original headlights, and scratches below the RH headlight that were there when I purchased the car 4 years ago.


    After - with "newness".

    No more scratches.

    It certainly saved me a lot of work having the new headlights fitted by the panel beater whilst the bar was off.

    Last edited by leadfoot6; 03-06-2019 at 09:58 PM.
    ...

  4. #24
    ...
    Join Date
    Aug 2014
    Location
    New South Wales
    Posts
    961

    Default

    Quote Originally Posted by leadfoot6 View Post
    Before - with the original headlights, and scratches below the RH headlight that were there when I purchased the car 4 years ago.


    After - with "newness".

    No more scratches.

    It certainly saved me a lot of work having the new headlights fitted by the panel beater whilst the bar was off.

    Since I made the above post in June, "Tinypic"(part of "Photobucket") has been closed down.

    Here is the "After" image reupped using:

    https://www.imagevenue.com/

    Last edited by leadfoot6; 06-11-2019 at 07:32 PM.
    ...

  5. #25
    ...
    Join Date
    Aug 2014
    Location
    New South Wales
    Posts
    961

    Default

    Quote Originally Posted by vlad View Post
    Make sure you have some spare scrivets. They are fairly cheap from mitsu spares.
    I'm not sure how much scrivets are from Mitsubishi.

    Earlier this year, I was having trouble securing the drivers door sill/scuff panel.

    The clips were breaking, and it was difficult to find replacements at a sensible price.

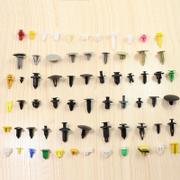
    I purchased a 200 item kit from eBay.

    It had a large variety of different types of clip, including scrivets.

    The kit killed 3(possibly more) birds with one stone.

    My scuff panel is now securely back in place, after trying some incorrect clips from the kit and finally establishing which was the correct type.

    I have now got a reasonable supply of scrivets.

    Some are missing around the top of the bumper bar/air intake.

    Also, I found some clips in the kit that has enabled me to fix my very old lounge room curtains that have very old securing parts on them that are unable to be purchased new from Spotlight etc.

    I'm sure I will find more uses in the future.

    Priceless.

    Actually, I paid $6 including postage for the kit for 200 pieces.

    That 200 piece kit is no longer available from the seller I purchased from.

    It is, however, available in a 100 piece kit for $2.41 from a different retailer.

    https://www.ebay.com.au/itm/100Pcs-A...4AAOSwa9dbyXpq

    Bargain.

    This is not the exact kit type(the variety in the image below is in excess of what will be available in the 100 piece kit), but it gives some idea of what is contained therein.


    Click to enlarge.....sigh.
    Last edited by leadfoot6; 14-11-2019 at 08:43 PM.
    ...

+ Reply to Thread

Thread Information

Users Browsing this Thread

There are currently 1 users browsing this thread. (0 members and 1 guests)


Posting Permissions

  • You may not post new threads
  • You may not post replies
  • You may not post attachments
  • You may not edit your posts